Crafting a captivating blog is key to engaging your audience and soaring in search engine rankings. But when it comes to website structure, the choice between a subdomain and a subdirectory for your blog carries significant SEO implications.
This guide delves into the world of hosting your WordPress blog on a subdirectory, specifically focusing on how to leverage the power of Cloudflare Workers to seamlessly integrate your blog within your existing Webflow website.
If you search Google for “WordPress blog on a subdirectory Webflow,” you’ll notice many search results asking the same questions. However, it seems that achieving this is not possible with Webflow. One of the answers suggested:
“You can redirect /blog to blog.subdomain.com, but you won’t be able to serve the WordPress site from a subdirectory since it cannot be hosted on Webflow.”
Webflow Forum
Now, imagine the combined benefits: the design flexibility and ease of use of Webflow for your main site, coupled with the robust content management features of WordPress for your blog – all operating under the same domain and enjoying the SEO advantages of a subdirectory structure.
Sounds too good to be true? Read on to discover how you can make this dream a reality!
Top SEO Benefits of Hosting Your Blog on a Subdirectory
Subdirectories, unlike subdomains, are treated as part of your main domain by search engines, offering SEO benefits like:
- Stronger Link Signals: Links to your blog pages contribute to your overall domain authority, boosting your main website’s ranking potential in search engines. Imagine the combined power of backlinks flowing to both your main site and your blog, strengthening your entire online presence.
- Unified Brand Identity: A consistent URL structure with your blog seamlessly integrated as a subdirectory (e.g.,
yourdomain.com/blog) reinforces brand recognition and creates a positive user experience. Visitors can easily navigate between your main site and blog content, understanding they’re part of the same brand. - Improved Crawlability: Search engines like Google efficiently crawl and index well-structured websites, ensuring your blog content gets discovered. Subdirectories make it easier for search engines to understand your website’s hierarchy and access all your valuable content.
The Shapo Challenge: Hosting a WordPress Blog on Webflow
At Shapo, we wanted to leverage the design flexibility of Webflow for our main website but desired the powerful content management features of WordPress for our blog. However, directly pointing /blog to our WordPress instance on AWS Lightsail wasn’t possible due to Webflow’s DNS limitations. This presented a challenge: how to integrate the blog seamlessly without compromising SEO or user experience? how can you add a WordPress blog to a website already built?

Cloudflare Workers emerged as the answer. We found out it might be the best way to integrate our WordPress blog with a static website, or in our case, with a Webflow website. We created a custom script that acts as a bridge between platforms. This script intercepts requests for /blog on our Webflow site (shapo.io) and dynamically fetches content from our WordPress site (blog.shapo.io). It then delivers the content seamlessly to the user, preserving essential elements like headers and cookies for a smooth experience.
This guide delves into how to seamlessly host your WordPress blog on Webflow by integrating your WordPress blog on a subdirectory using CloudFlare, empowering you to leverage the SEO advantages while enjoying platform flexibility.
How to Host Your WordPress Blog on a Subdirectory
Set Up Your WordPress Site
- Choose a reliable hosting provider like AWS Lightsail or explore other options suited to your needs. (We use AWS Lightsail with a Bitnami WordPress image, it’s super cheap ($5/month) and super easy to set up.)
- Ensure your WordPress instance has a static IP address or a connected domain for DNS record creation.
- Create a DNS record (e.g.,
blog.yourdomain.com) pointing to your WordPress site’s IP address. - Verify that your WordPress Address and Site Address are set correctly to reflect the subdirectory path (e.g.,
yourdomain.com/blog).

Now your blog is accessible via blog.domain.com (it’s not going to be the main domain, but it’s needed for setting up the CloudFlare worker down the road).
Make sure your WordPress Address and Site Address have the correct values e.g. domain.com/blog:

If it’s greyed out in your case like it is for us, you’d need to edit the wp-config.php file in your WordPress and change the WP_HOME and WP_SITEURL.
Configure Cloudflare Workers
Start with creating a CloudFlare worker to proxy the requests from your domain.com/blog to a website of your choice.
- Create a CloudFlare Worker to proxy requests from
yourdomain.com/blogto your WordPress site. - Implement the provided Worker code (with your domain adjustments) to dynamically fetch content and handle various request aspects.
- Pay close attention to query parameters and redirect handling to avoid website malfunctions.
Here’s the code for the worker, change the sourceDomain variable at the top to match your domain
const sourceDomain = 'blog.shapo.io';

async function handleRequest(request) {
 const parsedUrl = new URL(request.url)
 console.log('url:', request.url, 'parsed:', parsedUrl.toString());

 // if its blog html, get it
 if(parsedUrl.pathname.includes('/blog')) {
   parsedUrl.hostname = sourceDomain;
   parsedUrl.pathname = parsedUrl.pathname.replace('/blog', '');
   console.log('requesting:', parsedUrl.toString());
   const response = await fetch(parsedUrl, request);
   return response;
 }

console.log("this is a request to my root domain", parsedUrl.host, parsedUrl.pathname);
 // if its not a request blog related stuff, do nothing
 return fetch(request)
}


addEventListener("fetch", event => {
 event.respondWith(handleRequest(event.request))
})
Activate CloudFlare Worker Route
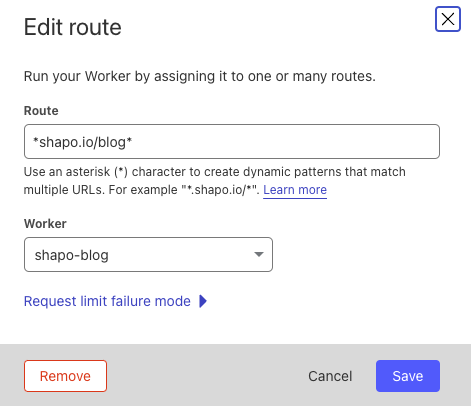
In your CloudFlare website dashboard, pick “Worker Routes” and “Add route”, use your intended blog route, and select the blog worker we created earlier:

Key Takeaways
In conclusion, hosting your WordPress blog on a subdirectory with Cloudflare Workers unlocks a powerful combination of SEO advantages, platform flexibility, and a unified user experience. Imagine the impact of boosting your main website’s ranking with backlinks flowing to your blog, strengthening your overall online presence. Plus, enjoy the ease of managing your blog with WordPress while maintaining the design freedom of Webflow for your main site.
By following this guide, you can implement the Cloudflare Worker solution and reap the benefits listed above. Remember to adapt the steps and code to your specific setup, and consider seeking expert advice for in-depth SEO strategies or complex scenarios.
Beyond the technical setup, don’t forget the power of high-quality content, strategic internal linking, and social media promotion to truly supercharge your blog’s success. Remember, SEO is an ongoing journey, so continuously optimize your content, technical aspects, and overall strategy for long-term results. Now go forth and create a thriving WordPress blog that seamlessly complements your main website and captivates your audience!


